
Author: Elena Botezatu — Instagram: @activity.box
1. Water and ice. Trapped in ice
Difficulty: *
Cost: *
Preparation: *
Age: 3+
Activities involving ice are wildly popular with kids, particularly on hot summer days. As they don’t require too much preparation (and I am always on the go), we repeat them quite often and introduce new elements every time, so as to keep the interest high.
After watching Ice Age, we decided to dig up a bunch of objects that had been trapped in ice and it turned out a big hit. I also took the opportunity to talk about ice and got the kids to learn some more STEM.
What you need:
– One tray (I used a metal one but plastic will do, too);
– Several small objects to trap in ice;
– Utensils: syringe, water dispenser (spray), other objects that may be used to dig and carve the ice
– Water, at room temperature;
– Warm water;
– Salt (optional);
– Food coloring (optional);
– Three separate bowls
Topics to discuss during the activity (depending on the kids age):
– What is ice? How it’s made?
– Where do we find ice?
– How can we describe ice? Cum does it feel?
– What do you think will happen when we pour water over ice? How about salt? How is warm water different?
– What can we use ice for?
How you do it
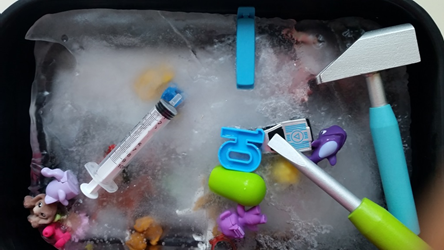
Put several small objects into the tray and pour water over them, so as to cover them completely. Try to mix heavier and lighter objects, for a nicer effect. You can also pick a theme for this activity, depending on the kids’ interests and whatever is easier for you. We tried dinosaurs, fish, trolls, animals, cars and plastic jewels so far and miscellanea a few times.
You can add food coloring, if you like. I sometimes like to put it but I wait until the tray is already in the freezer and don’t stir it, so I just get some colorful streams through the ice.
Leave the tray in the freezer overnight (or until completely frozen).
Give the kids plenty of water at room temperature, warm water, salt, as well as syringe, water dispenser and other utensils to dig and carve into the ice. We use the hammer and screwdriver from a construction set.
You may want to do the activity outside, as water spills are highly probable. We did it in the kitchen and it was fine but I also participated and prevented disasters.
First, encourage them to guess what is in the tray (if they did not take part in the preparation) and what they will be using the utensils for. Make guesses and build scenarios and talk about where we can find ice (possible answers: in the freezer, at the Poles, on the lake, on the skating rink etc.) and how it’s formed (it is actually frozen water).
Invite them to free the objects from the ice using the utensils. Then, work with water, warm water and salt. You may need to pour the water out of the tray several times. Notice the differences and constantly encourage kids to talk about what they notice. Encourage kids to describe the ice: it’s cold, hard, wet, transparent or opaque, slippery etc.
Think about what you can do with it: play, put it in our drinks, put in on bruises, skate on it etc.
BONUS: Take the three bowls. Fill one with water at room temperature, one with warm water (make as hot as possible but keep it comfortable to the touch) and one with very cold water (you can also put some ice in it).
Ask the kids to put one hand in the warm water and one in the icy water and keep them there for about 30 seconds. Then, put both hands in the water at room temperature. How does it feel? One hand should feel it warm, the other cold.
If they are old enough, talk to them about average “If I have one hand in cold water and one in hot water, does it mean that on average I have my hands in water at room temperature?”
2. Density. Sweet rainbow
Difficulty: ***
Cost: **
Preparation: **
Age: 4+
Color combinations are an endless source of fun. Pair them up with water and you get an instant hit. And if on top of that you add sugar, you get one super mega fun experiment, which you will want to repeat again and again.
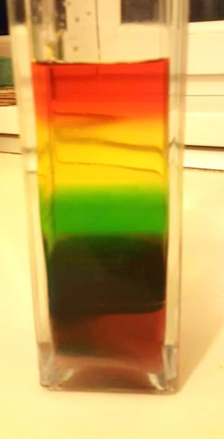
Making a sweet rainbow consists of pouring colored water in several layers, which don’t mix. The secret is in their different density, given by the different quantity of sugar in each layer.
Even if you need patience and a little bit of skill to do it, results are totally worth it!
What you need:
– One tall transparent container (we used a vase)
– 6 small glasses (like those used for shot)
– Water
– Sugar (approximately ½ kg)
– Food coloring: red, blue and yellow
– Pipette (you can do without and use a teaspoon, but it will be a lot more difficult and it will take longer)
– Spoon
Topics to discuss during the activity (depending on the kids age):
– What do you think will happen if we mix yellow and blue? What about red and blue? How can we make orange?
– What do you think will happen if we mix water and sugar?
– Where did the sugar disappear from the water?
– Why doesn’t all the sugar dissolve?
– How do you think it tastes? Which glass do you think is sweeter?
– How does the water and sugar mixture feel when you touch it? Are all the colors the same?
How you do it
Fill three of the six glasses (shots) with water. Pour a few drops of food coloring in each, so as to get red, yellow and blue water. Begin combining them using the other three glasses:
– Red + yellow — orange;
– Yellow + blue — green;
– Blue + red — purple.
Now you should have enough colors to make a rainbow; place the glasses in order: red, orange, yellow, green and blue. Make sure each glass is about half full.
Leave the red glass as it is. Put two (full) table spoonful of sugar in the orange one. Put four in the yellow one, six in the green and eight (full) table spoonful of sugar in the blue glass.
Stir patiently, until all the sugar dissolves. We also put the glasses in the microwave oven for 30 seconds, so as to help the processes. Now you have a sugar solution, with different concentrations. You can taste: which is the sweetest?
In the tall transparent container, pour the water with the most sugar in it (the blue one, in our case). With the help of a pipette, very slowly and patiently poor the green water. Let the colors settle; if you see that they mix and don’t separate, it means you poured them too fast. Repeat the operation until you finish all the colors. Red should be on top.
Our rainbow lasted for three days without mixing. We liked it so much, that we took it to the kindergarten, for everyone to see it. It even lasted throughout the car travel!
3. Logic. Make your own puzzle

Difficulty:*
Cost: *
Preparation: **
Age: 3+
Puzzles are great fun to complete and provide wonderful opportunities to develop valuable STEM skills such as logical thinking, memory or problem solving. Even more, they help kids learn how to establish goals and develop strategies so as to become more efficient and fast: for ex. they learn to sort out pieces in the beginning, to start at the corners and the margins etc.
Puzzles are great for the young and the grown-ups and make a good choice for independent, as well as for team play, in which case they help develop social skills, such as cooperation.
Today, I am proposing an activity which consists of creating your own puzzle. Such a puzzle has the advantage that can be easily adapted to the kids’ age and preference and, on top of that, it introduces a nice element of surprise.
What you need:
– One printed image or photo (letter or A4 size): you can print it black & white or color, even on a plain sheet of paper.
– Scissors.
Topics to discuss during the activity (depending on the kids age):
– What do you think the image represents? Can you tell only by looking at the pieces?
– How many pieces do you think we need to put in place before we realize what it is?
– How could we do it faster?
How you do it
Pick a funny photo of the kids or another image you know they’ll enjoy and print it in A4 format. Make sure the image is clear and relatively simple, without too many background elements and a good focal point.
Cut the image in even strips of about 1.5 cm or in squares of about 4cm per side. If solving this is too easy, pick more complicated images and/or cut it in smaller pieces.
Mix the pieces and you are done. You have a puzzle ready to be solved! If you want, you can store it in a zip-lock bag or put it into a fancier box, for a nicer presentation. We gave out such puzzles as party favors and they were a hit!
In our case, kids went overboard with surprise and fun when they realized were where in the puzzle. After I explained how I had done it, they wanted to make puzzles themselves.
BONUS: Go on http://www.jigsawplanet.com and make your own online puzzle. You can choose the number of pieces (from 4 to 300), as well as their shape (there are 8 models), for even more fun.
4. Density. Water and oil
Difficulty:*
Cost: *
Preparation: *
Age: 3+
There are a lot of fun experiments about density but this is probably the easiest and most popular. You need very few ingredients which you already have in the kitchen, it works all the time and lasts ages. Plus, it’s a great opportunity for hands-on learning about density
What you need
– Two transparent containers (we used jars)
– ½ cup of water
– ¼ cup of oil
– ¼ cup of dishwashing liquid (concentrated)
– Food coloring (optional)
– Pipette (optional)
Topics to discuss during the activity (depending on the kids age):
– What do you think will happen if we mix water and oil?
– How does oil feel like?
– Can you describe the difference between water, oil and dishwasher liquid?
How you do it
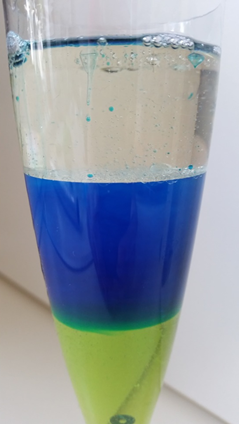
This one is ridiculously simple: put the dishwashing liquid in a jar. Add the water (if you use food coloring, make sure to color the water in advance, separately). Finally, add the oil on top of the water. Let the liquids settle and that’s it!
Fill the other jar with water. Separately, color a little bit of oil using food coloring. Take the oil into the pipette and drop it in the water. Stir well and enjoy!
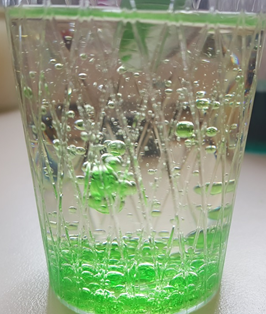
BONUS. You will need three jars (identical) with lids. Fill each jar with water, oil and dish washing liquid (concentrated type). Put a marble (or several) in each jar and close the lids. If you want, you can also add glitter and other small objects to make it a fun sensory experience. Turn each jar upside down and shake it. Analyze how the marble moves around — the thicker the liquid, the slower it moves.
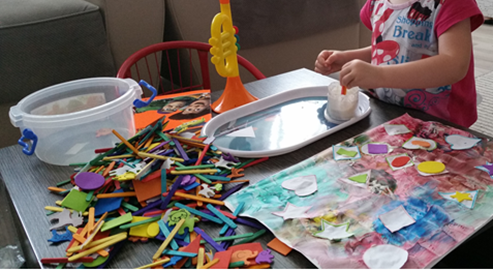
5. Artwork on artwork
Difficulty:*
Cost: *
Preparation: *
Age: 3+
If you’re like us, I am absolutely sure you have drawings and paintings lying around, some of them not even fully completed. I used to throw them away or stash them into files until I realized I can revamp and transform them into completely new artwork, while combining other media for creation.
What you need
– Previously made paintings or drawing which you no longer want to display or keep as such;
– Craft sticks (optional)
– Glitter (optional)
– Stickers (any kind will do)
– Glue (optional)
– Colors, any type (optional)
– Any other types of materials which you want to use (optional)
– Scissors (optional)
Topics to discuss during the activity (depending on the kids age):
– Color combinations
– Shapes
– Symmetry
– Perspective
How you do it
Use the previously made artwork as a canvas for your new creation. Put stickers on it, glue on craft sticks and different shapes (which you can cut from other artwork), add glitter.
Let your imagination run wild! Combine collage, painting and whatever else you like, in order to transform the canvas.
Voila! You have a completely new artwork!
Elena is the mom of a 5 year old girl who loves to spend time with her daughter but has very little time on her hands. She also believes that every game should be an opportunity for learning and every lesson should be an occasion to have fun.
If you want to find out other super-easy, super-quick and super-fun ideas follow her on Instagram @activity.box
Show the love and click the clap button. Join our blog for amazing giveaways and early childhood news!
For competitions and awesome early childhood stuff…
Follow on Facebook & Instagram or Twitter
Preschool Provider…let us show you how to reduce paperwork and spend more time with children here


